With Single Sign-On (SSO), you can efficiently manage your team's access to DeveloperHub projects in bulk, eliminating the need to add each member individually.
DeveloperHub easily integrates with your existing Identity Provider (IdP) so you can provide your employees with single sign-on to DeveloperHub using the same credentials and login experience as your other service providers.
By utilizing Single Sign-On (SSO), your employees can seamlessly access DeveloperHub directly from the shared dashboard provided by your Identity Provider (IdP), or alternatively via our dedicated login page. This integration enhances your control over access and security, streamlining the authentication process while ensuring a higher level of protection for your organization's resources.
DeveloperHub supports SAML 2.0, which works with but is not limited to:
- Okta
- OneLogin
- Azure
- Active Directory (ADFS)
Process for Setting Up SSO
The process for setting up SSO is as follows:
Contact us to let us know that you require SSO, providing us with which IdP you are integrating with.
We will provide you with an
sso_idwhich you can use to get the ACS URL. The Entity ID and logo are as follows:- ACS URL:
https://auth.developerhub.io/login/callback/<sso_id> - Entity ID:
https://auth.developerhub.io/sp - Logo link.
- ACS URL:
We will then require from you the IdP SSO URL, the IdP Issuer and a X.509 certificate.
Inform us of the SSO configuration you require.
If you have multiple SSO (Single Sign-On) integrations with DeveloperHub, we can provide you with an alternative entity ID. This will enable you to manage multiple integrations on the same Identity Provider (IdP) seamlessly. To obtain the alternative entity ID, please contact us.
Attributes
To streamline the process for your employees when entering their names on DeveloperHub, consider configuring optional attributes within your IdP setup as follows:
firstnameandlastnamefor First Name and Last Name of a user profile.nameif your user profiles have full names.roleto one ofADMIN,PUBLISHER,WRITER,REVIEWER.
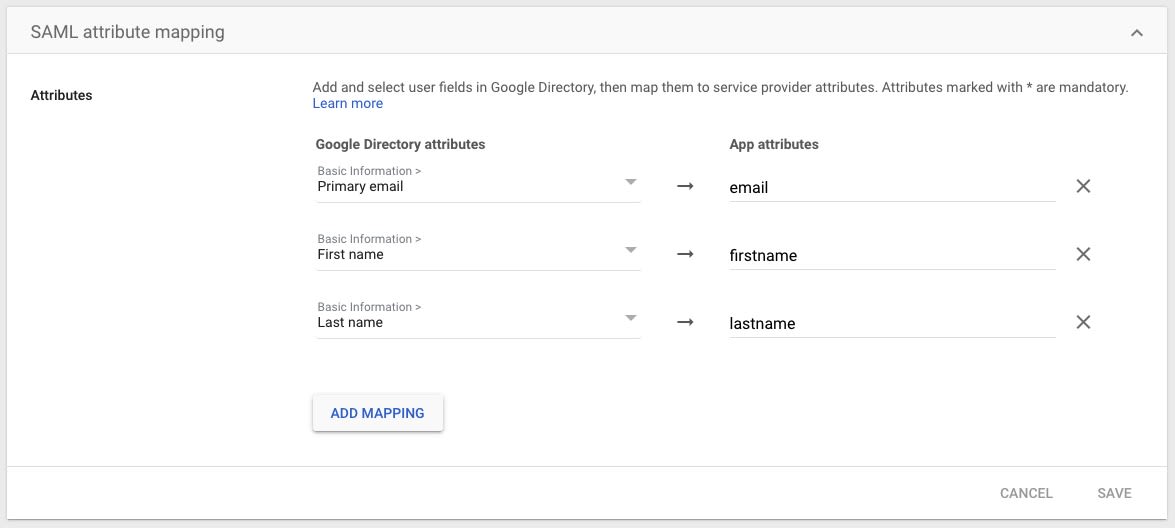
Google SSO
While configuring SSO, use EMAIL Name ID format with Basic Information > Primary email.
The attributes for Google SSO must look as follows:
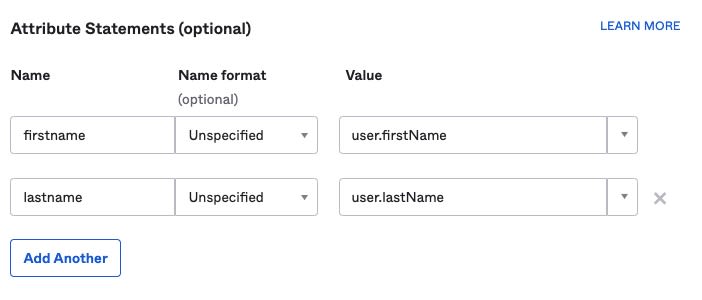
Okta SSO
While configuring SSO, use Name ID format EmailAddress and Application username to be Email.
The attributes for Okta SSO must look as follows:
Configuration
DeveloperHub provides configuration settings for SSO connections. They are:
- SSO Login Enforced: This setting determines whether editors are permitted to log in exclusively through Single Sign-On (SSO). By default, this option is disabled until the SSO connection has been successfully verified.
- Default role: The default role assigned to users who are created through the Single Sign-On (SSO) process.
- Add Users to All Projects by Default: This setting decides if a user gets automatic access to all projects in the organization when they log in, or if they need an invitation for each project separately.
- Email Domain (Optional): Specify the organization's email domain (e.g.,
tesla.com). This information is utilized when new users log in via Single Sign-On (SSO).
SSO settings can be accessed by organization owners from the sidebar under Organisation
Creating Users
To create or invite users to your project, you can:
- To initiate a session from your Identity Provider (IdP), follow the steps outlined in your IdP's documentation. This typically involves logging in through the IdP's portal, providing your credentials, and ensuring that you grant any necessary permissions for the session to be established. Once the session is active, you can proceed with the authentication process seamlessly.
- Provide them with a link which you can copy from Team
> Copy SSO Login URL - To invite them, use their e-mail address from Team
> Invite teammate to collaborate . An email will be sent to them containing the SSO Login URL. - If the "Email domain" is configured for the SSO connection, please ask them to log in directly from our login screen.
Logging in Users
To log in as an existing user, follow these steps:
- Initiate a session from your IdP.
- Provide them with a link which you can copy from Team
> Copy SSO Login URL . - Login directly from our login screen by using Log in Using SSO.
Deprovisioning Users
When deprovisioning a user, the following will happen:
- All of their projects will be permanently removed, regardless of whether they belong to the organization or are standalone.
- All their access to the organization's projects will be revoked.
- Their user account will be deleted. If they needed to be re-activated again, the user will be a new user.
To deprovision a user:
- From the sidebar, click on Team
. - Click on the badge next to the user, and click Deprovision from Organisation.
- Confirm your choice.
Once a user is deprovisioned, both their projects and user account are permanently removed from our system, and this action cannot be undone.
Debugging SSO Issues
If, during the SSO login process, you receive a message that varies based on your Identity Provider (IdP), indicating that the user is not permitted access to this application, it is essential to verify that the user has been assigned to the appropriate group within your IdP application settings.